An iOS app for plotting live data: ConAir:iOS
In previous posts on this blog we’ve built a basic environmental monitoring system which exposes data as a simple JSON webservice. This post is looking at how to build an iOS app to consume the timeseries data. We’ll establish the following:
- A datasource object which pulls data from a webservice
- Setting the data source to poll for new data
- Create a UI which updates when new data arrives
- Plotting the data in a chart
All of this can be applied to any webservice available, but since we have built something suitable as part of this blog we’ll use that.
We’re working towards building the sample app I’ve put together at github.com/sammyd/conair-ios. I’ll cover the most salient points, but won’t give an in-depth review of the app’s source code.
A DataSource
We’ll create a class which is responsible for retrieving the data, and storing a local cache of it. Our different UI controllers will interact with this class to get hold of datapoints to render.
We will only want one instance of a datasource at any one time - multiple data sources in one application would be both memory intensive, and would cause multiple network requests for the same data. We therefore make the datasource a singleton:
#import <Foundation/Foundation.h>

@interface ConairDatasource : NSObject

@property (nonatomic, strong, readonly) NSMutableArray *data;

+ (ConairDatasource*)sharedDataSource;

@end
This header also exposes a readonly data array - which we will use later. The equivalent implementation is as follows:
#import "ConairDataSource.h"

@interface ConairDatasource ()
@property (nonatomic, strong, readwrite) NSMutableArray *data;
@end

@implementation ConairDatasource

+ (ConairDatasource *)sharedDataSource
{
    static ConairDatasource *sharedDataSource = nil;
    static dispatch_once_t onceToken;
    dispatch_once(&onceToken, ^{
        sharedDataSource = [[self alloc] init];
    });
    return sharedDataSource;
}

@end
We’ve redefined the readonly data property to be readwrite, and implemented the
+sharedDataSource class method, to create a singleton.
In the first instance we’re going to pull the data from the webservice when the datasource is created, and to that end, we implement the standard constructor, and a utility method:
- (id)init
{
    self = [super init];
    if (self) {
        // Grab the inital data import
        [self collectDataFromInternet];
    }
    return self;
}

- (void)collectDataFromInternet
{
    NSDate *startDate = [NSDate dateWithTimeIntervalSinceNow:-24*60*60];
    NSDate *endDate = [NSDate date];

    // Generate the request URL
    NSString *urlString = [NSString stringWithFormat:@"http://sl-conair.herokuapp.com/data/?start=%@&stop=%@&step=%@",
                           [startDate dateAsISO8601String], [endDate dateAsISO8601String], @"120000"];
    NSURL *url = [NSURL URLWithString:urlString];

    // Send the request on a background thread
    dispatch_queue_t queue = dispatch_get_global_queue(DISPATCH_QUEUE_PRIORITY_DEFAULT, 0);
    dispatch_async(queue, ^{
    		// Get the data
        NSData *data = [NSData dataWithContentsOfURL:url];

        // Parse the JSON data
        NSError *error;
        NSArray *json = [NSJSONSerialization JSONObjectWithData:data options:kNilOptions error:&error];
        if(error) {
            NSLog(@"There was an error");
        } else {
            // Convert the JSON structure into a nice array
            NSMutableArray *dataPoints = [[NSMutableArray alloc] init];
            // Need to parse the date strings into NSDates
            NSDateFormatter *df = [[NSDateFormatter alloc] init];
            [df setTimeStyle:NSDateFormatterFullStyle];
            [df setDateFormat:@"yyyy-MM-dd HH:mm:ss Z"];
            [json enumerateObjectsUsingBlock:^(id obj, NSUInteger idx, BOOL *stop) {
            		// This data source has ts and temperature keys
                NSDate *ts = [df dateFromString:obj[@"ts"]];
                NSDictionary *datapoint = @{@"ts" : ts, @"temperature" : obj[@"temperature"]};
                [dataPoints addObject:datapoint];
            }];

            if (dataPoints.count > 0) {
                // Perform the assignment on the main thread
                dispatch_async(dispatch_get_main_queue(), ^{
                    self.data = dataPoints;
                });
            }
        }
    });
}
The collectDataFromInternet method does all the heavy lifting. Firstly we construct
the URL from which we can collect the data. This requires a start date, end date
and a sampling period. The dateAsISO8601String method is added on NSDate with a
category (using a NSDateFormatter to construct a string of the correct format).
We request the data on a background thread so as to not lock the main thread whilst
we wait for a response. Once the data has been retrieved, we can parse the JSON
into an NSArray using iOS methods - a lot easier since iOS 5 when these
were introducted.
We then iterate through this array, and create a datapoint object for each of
the received data points. Finally, we assign this newly created array to the
data property on the datasource object. Note that we do this operation back
on the main thread. By working on the main thread we can keep data property
as nonatomic, without worrying about multi-threading issues.
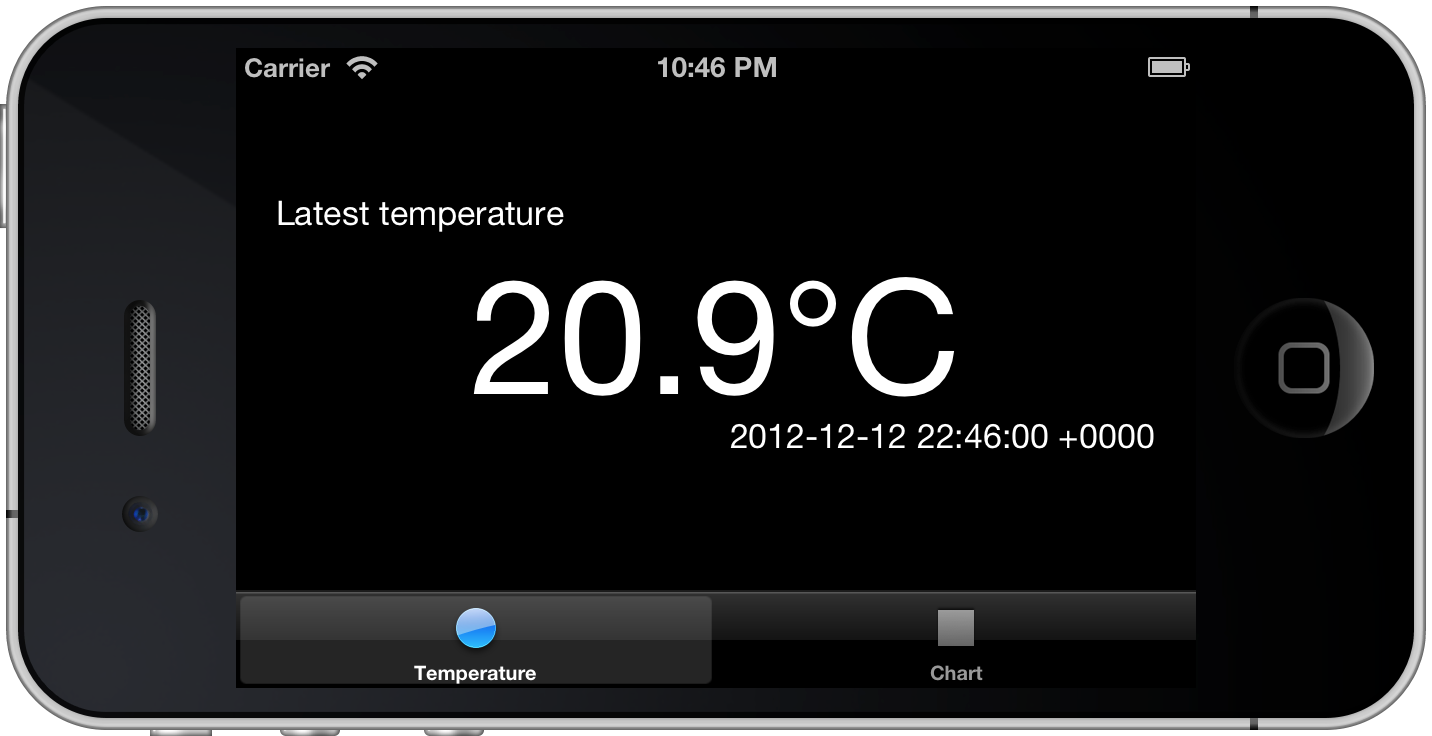
Now that we have a collected the data we could display the latest temperature in a label really simply:
ConairDatasource *datasource = [ConairDatasource sharedDataSource];
NSNumber *latestTemperature = [[datasource.data lastObject] objectForKey:@"temperature"];
self.lblTemperature.text = [NSString stringWithFormat:@"%.1f", [latestTemperature floatValue]];
There main issue with this as it stands is that the data property of the data source
will be nil until the data has been collected from the internet. We will address
this issue in the “auto-updating UI” section.
Polling for new data
The method we wrote before to pull data down from the internet performs the operation
once. If it is called again, it’ll request a new 24-hr period of data (based on
the current time), and replace the original. In order to support some polling
behaviour, we want to update the collectDataFromInternet method which to collect
any new data since the most recent data point we already have.
Firstly, we need to make sure that the start time is the timestamp of the last datapoint we already have:
NSDate *startDate = [NSDate dateWithTimeIntervalSinceNow:-24*60*60];
if(self.data && self.data.count != 0) {
    startDate = [[self.data lastObject] objectForKey:@"ts"];
}
When we are parsing the returned JSON, we should check that the data points
returned are newer than our latest one. This is primarily for the case where we
get a repeated data point at the boundary. Given that we’ve pulled the latest date
out into a local variable currentLatestDate (i.e. the date of the last object
in the data array), then we add the following conditional to the enumeration block:
// Let's check that we have a new data point
if(!currentLatestDate || !([ts isEqualToDate:currentLatestDate] || ([ts compare:currentLatestDate] == NSOrderedAscending))) {
    NSDictionary *datapoint = @{@"ts" : ts, @"temperature" : obj[@"temperature"]};
    [dataPoints addObject:datapoint];
}
And finally, rather than replacing the data property with the newly collected
datapoints, we might need to append the new datapoints to the existing data
array:
if(!self.data) {
    self.data = dataPoints;
} else {
    [self.data addObjectsFromArray:dataPoints];
}
Now, repeatedly calling this collectDataFromInternet method will update our
cached data array with new datapoints, if they are available. In order to repeatedly
call this we add an NSTimer to the datasource, and add methods to start and stop
the polling process.
@interface VPYConairDataSource () {
    NSTimer *pollingTimer;
}
...
@end

- (void)startPolling
{
    pollingTimer = [NSTimer scheduledTimerWithTimeInterval:self.pollingPeriod target:self selector:@selector(collectDataFromInternet) userInfo:nil repeats:YES];
}

- (void)stopPolling
{
    [pollingTimer invalidate];
    pollingTimer = nil;
}
Now we can send a startPolling message to the shared data source, and be assured
that it will contain the latest data at any given time.
In the app which demonstrates this we start the polling when the app loads and stop it when the app is no longer active:
- (BOOL)application:(UIApplication *)application didFinishLaunchingWithOptions:(NSDictionary *)launchOptions
{
    // Start polling for data
    [[VPYConairDataSource sharedDataSource] startPolling];
    return YES;
}

- (void)applicationWillResignActive:(UIApplication *)application
{
    // Stop polling for data
    [[VPYConairDataSource sharedDataSource] stopPolling];
}
A simple auto-updating UI
Now we have a datasource which will always have the most recent data, we want to ensure that we are always displaying the latest data. iOS has a helpful mechanism which we can utilise to assist with this task - Key-Value Observing.
KVO allows us to subscribe to be notified whenever a specified key-path is updated, and hence (in this instance) update the UI.
In our view controller, we subscribe to changes in the datasource’s data property:
- (void)viewDidLoad
{
    [super viewDidLoad];

    // We keep an ivar of the datasource
    dataSource = [VPYConairDataSource sharedDataSource];

    // Subscribe to listen to changes on the data property
    [dataSource addObserver:self forKeyPath:@"data" options:NSKeyValueObservingOptionNew context:NULL];
    // Placeholder text for the temperature label
    self.lblTemperature.text = @"updating...";
}

- (void)dealloc
{
    [dataSource removeObserver:self forKeyPath:@"data"];
}
The import message to send KVC-compliant objects to observe their property changes
is addObserver:forKeyPath:options:context. The will mean that the listener will
receive messages when the appropriate key-path changes. It is important to remove
observers when the instance is dealloc’ed, otherwise you’ll start getting zombie issues.
Whenever any KVO changes occur, they all pass a message of the same signature to the observer object. We implement the appropriate method, and update our temperature label:
- (void)updateTemperatureLabel
{
    self.lblTemperature.text = [NSString stringWithFormat:@"%2.1f°C", [[dataSource.data lastObject][@"temperature"] floatValue]];
    static NSDateFormatter *dateFormatter = nil;
    if (dateFormatter == nil) {
        dateFormatter = [[NSDateFormatter alloc] init];
        [dateFormatter setTimeStyle:NSDateFormatterFullStyle];
        [dateFormatter setDateFormat:@"yyyy-MM-dd HH:mm:ss Z"];
    }
    self.lblLastUpdated.text = [dateFormatter stringFromDate:[dataSource.data lastObject][@"ts"]];
}

- (void)observeValueForKeyPath:(NSString *)keyPath ofObject:(id)object change:(NSDictionary *)change context:(void *)context
{
    if([keyPath isEqualToString:@"data"] && [object isEqual:datasource]) {
        [self updateTemperatureLabel];
    }
}
It’s (almost) that simple. Now, whenever the data property is changed on the
datasource the temperature label will be updated. If you run up your app at this
point you’ll see that the label appears with updating... in it, and then after
a short time a temperature value is displayed. Fantastic.
However, there is a slight issue. The KVO will only be triggered when the property itself is changed. This happens when we first receive data, but subsequent polling updates don’t change the property, but instead add the new datapoints to the end of the array. This doesn’t trigger the KVO, so won’t update the label.
In order to get updates when objects are added to our array, we need to implement (and use) the Key-Value Coding collection accessor methods on our datasource. These
#pragma mark - KVC methods
// We implement these so that we get KVO updates on array insertion
- (NSUInteger)countOfData
{
    return self.data.count;
}

- (id)objectInDataAtIndex:(NSUInteger)index
{
    return self.data[index];
}

- (void)insertObject:(NSDictionary *)object inDataAtIndex:(NSUInteger)index
{
    [self.data insertObject:object atIndex:index];
}

- (void)removeObjectFromDataAtIndex:(NSUInteger)index
{
    [self.data removeObjectAtIndex:index];
}

- (void)replaceObjectInDataAtIndex:(NSUInteger)index withObject:(NSDictionary *)object
{
    [self.data replaceObjectAtIndex:index withObject:object];
}
There are more details on these methods in the apple documentation.
We wrap the standard NSMutableArray methods as appropriate.
Then, when we add data to our array, we simply need to use these KVC accessor methods instead of the array directly - this will then trigger the KVO update:
if(!self.data) {
    self.data = dataPoints;
} else {
    for (NSDictionary *dp in dataPoints) {
        [self insertObject:dp inDataAtIndex:self.data.count];
    }
}
If you run the app up now, then you’ll see that the date label gets updated as the polling process pulls in more data (note, new data on the ConAir service arrives approximately every 2 minutes). Perfect - and with no changes to code in the view controller.
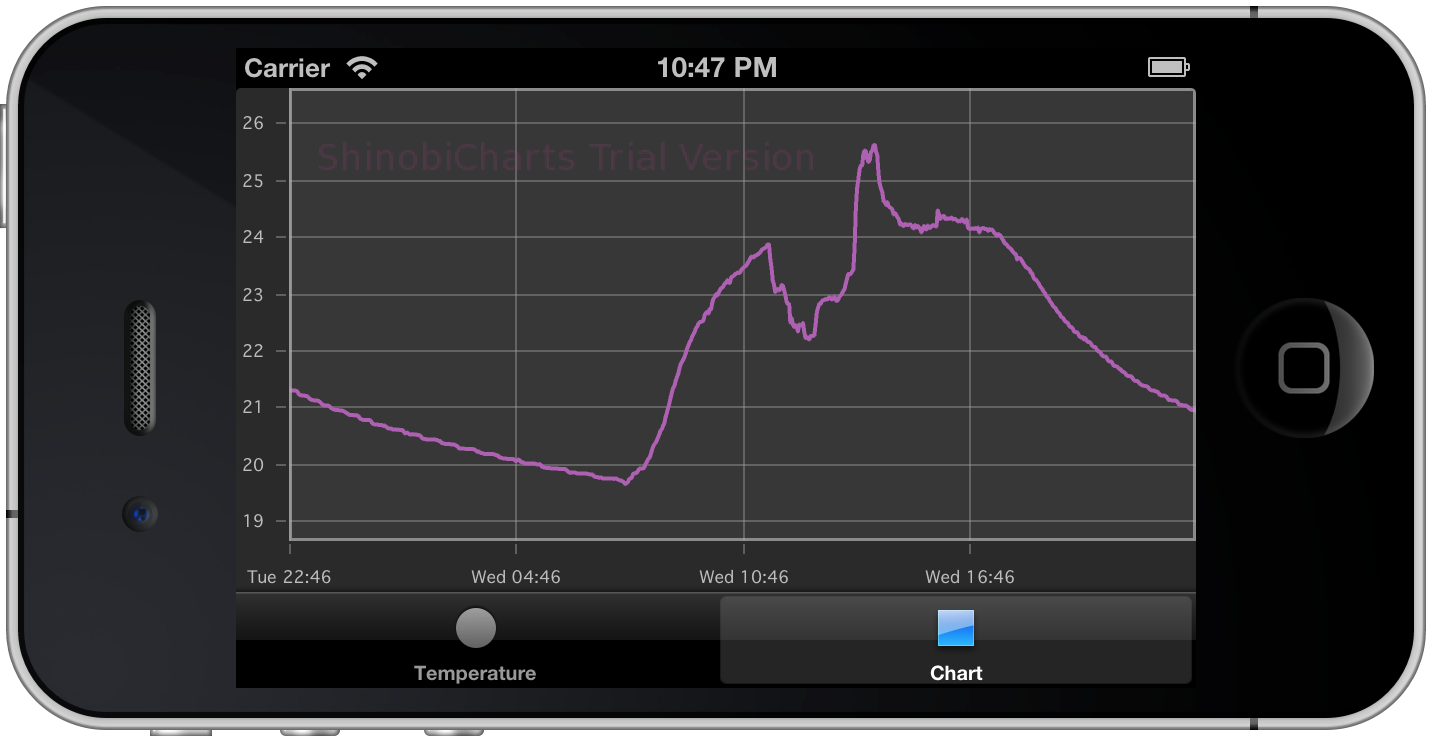
Plotting data in a chart
Although this post has been about getting live data from the internet on an iOS device, the driving force behind it has been plotting the ConAir data we’ve been collecting on a nice chart on an iOS device. We’ve now got a datasource which has the time series we want to plot. So, now to add a chart.
This post isn’t about how to plot charts in iOS, so I’ll just give a quick summary here. We’re going to use a super-cool charting library called ShinobiCharts. You can get a 30-day trial free of charge, so go ahead an grab it and give it a try. If you have serious charting needs for iOS then you should definitely give it a try (disclaimer: I work for the company which creates ShinobiControls).
A chart is a UIView subclass, so we add one to a new view controller, and then provide it with a data source.
- (void)viewDidLoad
{
    ...

    chart = [[ShinobiChart alloc] initWithFrame:self.view.bounds withPrimaryXAxisType:SChartAxisTypeDateTime withPrimaryYAxisType:SChartAxisTypeNumber];
    chart.licenseKey = [VPYShinobiLicense getShinobiLicenseKey];
    chart.datasource = dataSource;
    chart.theme = [SChartDarkTheme new];

    chart.xAxis.enableGesturePanning = YES;
    chart.xAxis.enableGestureZooming = YES;
    chart.xAxis.enableMomentumPanning = YES;
    chart.xAxis.enableMomentumZooming = YES;
    chart.yAxis.enableGesturePanning = YES;
    chart.yAxis.enableGestureZooming = YES;
    chart.yAxis.enableMomentumPanning = YES;
    chart.yAxis.enableMomentumZooming = YES;
    chart.yAxis.rangePaddingHigh = @1;
    chart.yAxis.rangePaddingLow = @1;

    chart.autoresizingMask = UIViewAutoresizingFlexibleWidth | UIViewAutoresizingFlexibleHeight;

    [self.view addSubview:chart];
}
We update our existing datasource to adopt the
SChartDatasource protocol, which can then be used to provide the data to the
chart:
#pragma mark - SChartDatasource methods
- (int)numberOfSeriesInSChart:(ShinobiChart *)chart
{
    return 1;
}

- (int)sChart:(ShinobiChart *)chart numberOfDataPointsForSeriesAtIndex:(int)seriesIndex
{
    return self.data.count;
}

- (NSArray *)sChart:(ShinobiChart *)chart dataPointsForSeriesAtIndex:(int)seriesIndex
{
    NSMutableArray *datapointArray = [[NSMutableArray alloc] init];
    [self.data enumerateObjectsUsingBlock:^(id obj, NSUInteger idx, BOOL *stop) {
        SChartDataPoint *dp = [[SChartDataPoint alloc] init];
        dp.xValue = obj[@"ts"];
        dp.yValue = obj[@"temperature"];
        [datapointArray addObject:dp];
    }];
    return [NSArray arrayWithArray:datapointArray];
}

- (SChartSeries *)sChart:(ShinobiChart *)chart seriesAtIndex:(int)index
{
    SChartLineSeries *series = [[SChartLineSeries alloc] init];
    return series;
}
These are the required methods of an SChartDatasource and are all pretty self
explanatory.
We repeat the same KVO process we did on the label updating view controller:
- (void)redrawChart
{
    [chart reloadData];
    [chart redrawChartAndGL:YES];
}

- (void)observeValueForKeyPath:(NSString *)keyPath ofObject:(id)object change:(NSDictionary *)change context:(void *)context
{
    if([keyPath isEqualToString:@"data"] && [object isEqual:dataSource]) {
        [self redrawChart];
    }
}
And we’re done! That gives us a chart of the last 24 hours of temperature data, which will live-update as new readings are send from the arduino board we put together way back when!
As ever, the source code for the sample app I’ve based this post on is available on github at github.com/sammyd/conair-ios. I make no guarantees of code quality - it’s a proof of concept and should be treated as such. If you wish to try the charts then you’ll have to sign up to a trial on shinobicontrols.com, add the framework to the Xcode project and replace the license key in the github repo with the one provided in your trial email.